The methods below are considered deprecated; dotCMS recommends using the Workflow API to save content instead.
The Content REST API allows you to search and render dotCMS content, and allows you to save and update dotCMS content via JSON, XML and Form UrlEncoded data formats.
Usage
Base URL
The base URL for saving content is http[s]://[host]:[port]/api/content.
HTML Methods (PUT/POST)
You can submit content to dotCMS using either HTML PUT or POST methods. By convention, POST is used for inserting new content and PUT is used for updating existing content; however the API calling conventions for both are identical.
Important
When updating content using the REST API, you must submit all fields (including all relationships) for a piece of content each time you update the content.
- If you wish to update only a single field value or relationship (while maintaining all other existing field values and relationships), you must first read all existing fields and find all existing relationships so that you can include them when updating the content.
- Any field values and relationships which are not included when you update a content item via the REST API will be removed from that content item.
Header Fields
The following Request header fields are recognized. Which headers are required and which are optional depends on the operation being performed.
Content Type Identification
The header for every content submission must include a contentType field to identify the Content Type of the content to be added or modified. The contentType field must specify the variable name of the Content Type.
Content Type Fields
The data for each field of the Content Type is defined using the Velocity variable name of each field in the Content Type as the header field name/key, and the value of the field (as a string) as the header field value.
Field Value Formats
All field values are passed in the POST or PUT header as strings. Below is a list of field types in dotCMS and the supported formats for each type:
| Field Type | Supported Formats |
|---|---|
| Binary | Please see Binary Fields, below. |
| Category | A string containing a comma separated list of Category ids, Category keys, or Category variable names. (e.g. "investing,research,wealthManagement").Please see Categories, below. |
| Checkbox, Multi-Select | A string containing a comma separated list of selected values (the strings to the right of the pipe (\ |
| Constant Field, Hidden Field | Should not be submitted with the content item. (These are filled in automatically by dotCMS). |
| Custom Field | A string containing the field value (as formatted by your Custom Field code). |
| Date, Time, Date and Time | yyyy-MM-dd HH:mm:ss, yyyy-MM-dd HH:mm, d-MMM-yy, MMM-yy, MMMM-yy, d-MMM, dd-MMM-yyyy, MM/dd/yyyy hh:mm:ss aa, MM/dd/yyyy hh:mm aa, MM/dd/yy HH:mm:ss, MM/dd/yy HH:mm:ss, MM/dd/yy HH:mm, MM/dd/yy hh:mm:ss aa, MM/dd/yy hh:mm:ss, MM/dd/yyyy HH:mm:ss, MM/dd/yyyy HH:mm, MMMM dd, yyyy, M/d/y, M/d, EEEE, MMMM dd, yyyy, MM/dd/yyyy, hh:mm:ss aa, hh:mm aa, HH:mm:ss, HH:mm, yyyy-MM-dd.Note: You may use formats that only include the date or time for Date and Time fields, but you may not use a format which includes both the date and time for Date fields or Time fields. |
| File, Image | The path to the related file, starting with the hostname (e.g. "//demo.dotcms.com/images/photos/The-Gherkin-London-England.jpg"). |
| Key/Value | Please see Key/Value Pair Fields, below. |
| Radio, Select | A string containing the selected value for the field (the string to the right of the pipe (\ |
| Relationship | Please see Relationships, below. |
| Site or Folder | A string representing the host (e.g. "demo.dotcms.com"), a folder (for the host the user is on) (e.g. "/images/photos"), or a combination of host and folder (e.g. "demo.dotcms.com:/images/photos/". |
| Tag | A comma separated list of tag values (e.g. "investment,banking,europe"). |
| Text | A string containing the field value. |
| Textarea | A string containing the field value. Non-printing characters should be escaped using HTML escape codes (e.g. %0D%0A for carriage-return line-feed). |
| WYSIWYG | A string containing the field value, containing HTML formatting. Non-printing characters should be escaped using HTML escape codes (e.g. %0D%0A for carriage-return line-feed). |
Files / Multipart Form Data
Sending multipart/form-data is supported, and is required in order to send file content for Binary fields.
Language ID
You may specify the language version of the content item you wish to add or update by setting the languageId field in the header, with the value equal to the id number of the language for the content item (e.g. 1 for the default language, 2 for the first added language, 3 for the next configured language, etc.). If the language_id field is not set, the default language will be used.
Content Type Header
The format of the content should be specified in the Content-Type header. Supported Content-Types include:
- application/json
- application/xml
- application/x-www-form-urlencoded
For more information on submitting content using these content types, please see Data Formats, below.
Operations
You may save and update content via the REST API in several different ways. The URL used to perform the operation specifies what operation you wish to perform. A URL which does not include an argument specifying the operation will throw an error (e.g. just /api/content/ without a save, publish, workflow action name, etc.).
Save or Publish (Working vs. Publishing Versions)
The URL you use to submit content must specify whether you wish save the content (submit a working version of the content without publishing) or publish it (which both saves the working version and then publishes it). To select save or publish, add /save/1 or /publish/1 to the URL after the /content/ portion of the base URL (e.g. /api/content/save/1 or /api/content/publish/1).
Execute a Workflow Action
You may execute a Workflow Action on a piece of content instead of directly saving or publishing it. To execute a Workflow Action, the argument following the /content portion of the URI must match either the Name or Identifier of a Workflow Action which is currently available for the content item.
The specified Workflow Action will be execited if all of the following are true:
- The Workflow Scheme the Action is a part of must be attached to the Content Type of the content.
- If the Content Type has mutliple Workflow Schemes attached to it, the content must be in the Workflow Scheme the Action is a part of.
- The Workflow Action must be available in the current Workflow Step the content item is in.
- The user executing the REST API call must have permission to execute the specified Workflow Action (as specified in the Who can Use section of the Action configuration).
- The Action must include at least one Sub-Action that performs a save of the content.
- Workflow Actions which do not save the content can not be executed from the Content API.
- To execute Workflows Actions without a save Sub-Action, please use the Workflow REST API.
Action Parameters
If the Workflow Action allows comments or allows the user to assign the Workflow Task, you may pass wfActionComments and/or wfActionAssign parameters in the URI, as appropriate.
Passing Text Strings
Since all information to execute the Workflow Action is passed in the URI, you must property encode any text strings. So when specifying the Action via the Action Name, or when passing comments or other text strings, you must use appropriate URL percent encoding in place of any characters which are not appropriate to be passed in a URL. For example, you must use %20 in place of a space, %21 in place of an exclamation point, etc.
Example
The following executes the “Assign for Review” Workflow Action with the comment “Hey, take a look”, and assigns it to the user with id “dotCMS.org.7575”:
PUT /api/content/Assign%20for%20Review/1/wfActionComments/Hey%2C%20take%20a%20look/wfActionAssign/dotCMS.org.7575
Other API Endpoints
For more information on addition endpoint methods available via the Content REST API, please see the REST API Endpoints documentation.
Response Headers
When the content item is successfully created or updated, 3 headers are returned:
| Header | Description |
|---|---|
| Location | A pointer to where the content can be obtained using the Content REST API. |
| Inode | The inode of the content version just saved. |
| Identifier | The identifier of the content object just saved. |
Authentication
This API supports the same REST authentication methods as other REST APIs in dotCMS. Please read the REST API Authentication documentation for details on the different methods and how to use them when saving content using the REST API.
Note, however, that by default only authenticated users may save content via the REST API. You can configure dotCMS to enable saving of content by non-authenticated (front-end) users (for example to allow front-end users to submit forms which save content using the REST API).
Saving by Non-Authenticated Users
To allow non-authenticated users to save content via the REST API, you must perform all of the following configuration steps:
- Set the following properties in the
dotmarketing-config.propertiesfile.CONTENT_APIS_ALLOW_ANONYMOUS=write REST_API_REJECT_WITH_NO_USER=false- Note: It is strongly recommended that all changes to the dotCMS configuration files be made through a properties extension file.
- Set permissions to allow the CMS Anonymous user to save content of the appropriate Content Types.
- Grant Add to permissions to the CMS Anonymous role on the Site where the content will be saved using the REST API.
- Grant Edit permissions to the CMS Anonymous role on each Content Type which will be added or updated via the REST API.
For more configuration on how access to the REST API can be controlled via configuration, please see the REST API Authentication documentation.
Data Formats
You may submit data via the Content REST API using several different data formats. The following examples demonstrate ways to submit content via the REST API using JSON, XML, and Form UrlEncoded formats, both to create new content and to update existing content.
Note: Examples Using curl
The following examples use the curl command, which is a command line utility (available for Linux, OS X, and Windows) which allows you to easily perform the HTTP PUT and POST methods required to create and update dotCMS content.
Note:
- The curl command provides two different methods for submitting REST API calls using JSON format (using the curl
-Hoption and using the curl-Foption).- The examples below demonstrate both methods.
- The format for submitting header names is different for each method.
- See the below examples, and make sure to specify the header names appropriately for the method you use.
- Admin passwords are assumed to be
admin, as on the demo site and starters prior to version 22.06. For versions 22.06 or later, this is no longer the default initial password; now, default passwords are either configured through theINITIAL_ADMIN_PASSWORDoption, or take the form of a random string generated on first startup and displayed in the server logs.
JSON
The following curl command creates content of the “Content (Generic)” Content Type (on the dotCMS starter site or demo site) using basic authentication:
curl -v -u admin@dotcms.com:admin -XPUT http://localhost:8082/api/content/publish/1 -H "Content-Type:application/json" -d '{
    contentType:"webPageContent",
    languageId:1,
    title:"test content",
    contentHost:"demo.dotcms.com",
    body:"test body"
}'
Creating and then Updating an EXISTING piece of content
Special Note: Updating content by identifier will not affect the contentlet's relationships to other content. Relationships are preserved when the content is updated by identifier thru the REST Api.
curl -v -u "admin@dotcms.com:admin" -XPUT http://localhost:8082/api/content/publish/1 -F 'json={
   "contentType":"webPageContent",
   "contentHost":"demo.dotcms.com",
   "title":"Test 001 - Created through curl",
   "body":"<b>Created through curl</b>"
};type=application/json'

< HTTP/1.1 100 Continue
< HTTP/1.1 200 OK
* Server Apache-Coyote/1.1 is not blacklisted
< Server: Apache-Coyote/1.1
< Location: http://localhost:8082/api/content/inode/3227c025-4bb5-4947-843e-9dd2cb95a9dd
< inode: 3227c025-4bb5-4947-843e-9dd2cb95a9dd
< identifier: 699c969c-4be3-4f8d-9d80-da8ff0ab7c7d
< Content-Type: text/plain
< Content-Length: 0
< Date: Wed, 22 Jul 2015 20:42:24 GMT
<
* Connection #0 to host localhost left intact

(some of the output is omitted)

curl -v -u "admin@dotcms.com:admin" -XPUT http://localhost:8082/api/content/publish/1 -F 'json={
   "identifier":"699c969c-4be3-4f8d-9d80-da8ff0ab7c7d",
   "contentType":"webPageContent",
   "contentHost":"demo.dotcms.com",
   "title":"Test 001 - Created through curl",
   "body":"<b>Updated through curl</b>"
};type=application/json'

< HTTP/1.1 100 Continue
< HTTP/1.1 200 OK
* Server Apache-Coyote/1.1 is not blacklisted
< Server: Apache-Coyote/1.1
< Location: http://localhost:8082/api/content/inode/644c5d16-e0b0-4d1e-a53d-16777197d73f
< inode: 644c5d16-e0b0-4d1e-a53d-16777197d73f
< identifier: 699c969c-4be3-4f8d-9d80-da8ff0ab7c7d
< Content-Type: text/plain
< Content-Length: 0
< Date: Wed, 22 Jul 2015 20:45:44 GMT
<
* Connection #0 to host localhost left intact

(some of the output is omitted)
XML
curl -v -u admin@dotcms.com:admin -XPUT http://localhost:8082/api/content/publish/1 -H "Content-Type:application/xml" -d '
<content>
    <contentType>webPageContent</contentType>
    <languageId>1</languageId>
    <title>test content</title>
    <contentHost>demo.dotcms.com</contentHost>
    <body>test body</body>
</content>'

< HTTP/1.1 200 OK
< Server: Apache-Coyote/1.1
< Set-Cookie: JSESSIONID=3806974B823401EEDCB1916FF0469719; Path=/; HttpOnly
< Location: http://localhost:8082/api/content/inode/534c547e-dba9-458b-aef0-b977c7fc2a7e
< inode: 534c547e-dba9-458b-aef0-b977c7fc2a7e
< identifier: 52c81804-e789-48b3-b5c1-0de73a8cacea
< Content-Type: text/plain
< Content-Length: 0
Form UrlEncoded
curl -v -u admin@dotcms.com:admin -XPUT http://localhost:8082/api/content/publish/1 -H "Content-Type:application/x-www-form-urlencoded" -d 'contentType=webPageContent&languageId=1&title=test%20content&contentHost=demo.dotcms.com&body=test%20body'

< HTTP/1.1 200 OK
< Server: Apache-Coyote/1.1
< Set-Cookie: JSESSIONID=9589AC9A470E506BC3ED3D779ABF9DF4; Path=/; HttpOnly
< Location: http://localhost:8082/api/content/inode/25942273-57c2-4aa3-bbad-710b7bf3b1bf
< inode: 25942273-57c2-4aa3-bbad-710b7bf3b1bf
< identifier: 11840c4a-57b7-4618-995d-dc935b2fe53b
< Content-Type: text/plain
< Content-Length: 0
Field Types
The following examples demonstrate how to send content for several additional types of Content Type fields.
Categories
Categories can be specified using a comma separated list. Each item in the list will be checked first to see if it matches a Category inode, then to see if it matches a Category key, and finally to see if it matches a Category variable name. If any of these are matched, the appropriate Category will be set for the content item.
The following example adds a News content item on the dotCMS demo site (uploading categories variable names):
curl -v -u admin@dotcms.com:admin -XPUT http://localhost:8082/api/content/publish/1 -H "Content-Type:application/json" -d '{
   contentType:"webPageContent",
   languageId:1,
   urlTitle:"a-new-news-item",
   hostfolder:"demo.dotcms.com",
   title:"A new news item",
   byline: "this is a new story",
   sysPublishDate: "2013-07-01 00:00:00",
   story: "this is a new story uploaded from cURL",
   topic: "investing,banking,research"
}'
< HTTP/1.1 200 OK
< Server: Apache-Coyote/1.1
< Set-Cookie: JSESSIONID=350BB6A31730E2EC3EF5B0A963B38F5E; Path=/; HttpOnly
< Location: http://localhost:8082/api/content/inode/b5b468f8-f304-4312-a566-5a294786a5a6
< inode: b5b468f8-f304-4312-a566-5a294786a5a6
< identifier: f5a13b1a-d0fc-4934-a6a5-9dc80aaf768d
< Content-Type: text/plain
< Content-Length: 0
Binary Fields
Files can be uploaded into Binary fields using multipart/form-data.
- Portions of the API call using JSON, XML or Form UrlEncoded data are interpreted as normal field values.
- Portions of the API call using a
Content-Dispositionheader are added as Binary field values.
Single or multiple binary files can be uploaded as part of a piece of content. Regardless of which method is used, all required binary fields on the Content Type must be submitted.
Uploading a Single Binary File
The following curl command submits a single binary image to a File Asset type of content using the REST API. Note the JSON portion of the API call to set the regular field values, and the file included using @ (which will submit the specified file to the first Binary field in the Content Type).
curl -v -u admin@dotcms.com:admin
  -XPUT http://localhost:8082/api/content/publish/1
  -F "json={
    contentType:'fileAsset',
    hostFolder:'demo.dotcms.com:/images',
    title:'nice.jpg',
    fileName:'nice.jpg'};
    type=application/json"
  -F "file=@nice.jpg;
    type=application/jpg"


< HTTP/1.1 100 Continue
< HTTP/1.1 200 OK
< Server: Apache-Coyote/1.1
< Set-Cookie: JSESSIONID=1008EEB589168054CAF7C9E9C3D678A3; Path=/; HttpOnly
< Location: http://localhost:8082/api/content/inode/197c5b4c-417a-4ba5-98e6-12f5cda1889b
< inode: 197c5b4c-417a-4ba5-98e6-12f5cda1889b
< identifier: fc2816da-107a-4c01-b404-bd552503f0f4
< Content-Type: text/plain
< Content-Length: 0
Uploading Multiple Binary Fields
The following curl command submits a File Asset using the REST API with TWO binary fields. The names of the two fields are “fileAsset” and “newBinary”. Note the JSON portion of the API call to set the regular field values, and the file included using @ (which will submit the specified file to the Binary fields in the order expressed using in the binary_fields parameter that has been added to the curl command).
Important Note: Notice that the binary_fields parameter is ordering the submit of the files to the fields in the content. When using the binary_fields parameter:
- The order of the fields submitted to the parameter determines which fields the binary files will be uploaded to
- Non-required binary fields may be omitted e.g., if the Content type has 4 non-required binary fields, supplying the names of only the 2nd and 3rd fields to the binary_fields parameter will upload only two binary files to those specified fields and leave the other two binary fields empty.
- The number of fields supplied to the
binary_fieldsparameter must match the number of files that are appended at the end of the REST API submit - The names of each binary field will match the
fileNamespecified in the REST API submit. More flexibility on multiple binary field naming will added in a future dotCMS version.
The curl command below uses the binary_fields parameter two upload two files to a new contentlet of type “File Asset”. The order of the fields supplied to the parameter, in the example provided below, determines which fields the appended files will be uploaded to respectively i.e., test9.jpg will be uploaded to the fileAsset field, and test10.jpg will be uploaded to the bin2 field.
curl -v -u admin@dotcms.com:admin -XPUT http://localhost:8082/api/content/publish/1
-F "json={stName:'FileAsset',hostFolder:'demo.dotcms.com:/images',title:'test9,test10',
binary_fields:'fileAsset,bin2',fileName:'test9.png,test10.png'};type=application/json"
-F "file=@test.png;type=application/png" -F "file=@test.png;type=application/png"
Key/Value Pair Fields
In the following example, a Key/Value pair field on a Content Type called “Television” has the Velocity variable name of “productSpecifications”. As shown in the example below, keys and values can be sent via REST API using the following form: fieldVelocityVariableName:{"mykey1:"myValue1","mykey2:"myValue2",... etc.}. Note the handling of the “productSpecifications” key/value pair field.
curl -v -u admin@dotcms.com:admin -XPUT http://localhost:8082/api/content/publish/1 -H "Content-Type:application/json" -d '{
   contentType:"Television",
   languageId:1,
   contentHost:"demo.dotcms.com",
   brandAndModel:"Samsung UN65JS9500",
   resolution:"Ultra HD",
   screenSizeinches:"65",
   productSpecifications:{"Refresh Rate":"240 CMR (Effective)","Backlight":"LED","Smart Functionality":"Yes - Built in Wifi","Inputs":"2 HDMI, 2 USB"}
}'
Relationships
Beginning with the dotCMS 5.1.x dotCMS series, one sided relationships were introduced to make individual relationships fields viewable/editable/searchable individually on either side of the content relationship. To learn more about these changes, please see the Relating Content on Content Types and Relating Content documentation. If you are upgrading from a pre-5.1 dotCMS version, please see the Migrating Legacy Relationships documentation.
The examples below show how to submit related content via REST API using one-sided relationship fields. This methodology works for One-to-One, One-to-Many, or Many-to-Many relationships.
Submiting Related Content with Relationship Fields
To relate content, you must specify the variable name of the Relationship field, and set the value to a string with one or more lucene queries and/or content identifiers, separated by commas. For content that already has existing relationships, you may delete, replace, or preserve the existing relationships by passing the appropriate value to the Relationship field, as follows:
| Information Passed to the Relationship Field | Results |
|---|---|
Empty String (e.g. "") | Remove all existing relationships (if any). |
| String of queries/ids (separated by commas) | Replace existing relationships (if any) with the specified relationships. |
| No relationship field passed | Preserve (make no changes to) existing relationships (if any). |
When submiting related content via the REST API, use the following format:
Relate a single piece of content by identifier
{relationship field velocity variable name}:"{identifier}"
Relate a multiple pieces of content by identifier
{relationship field velocity variable name}:"{identifier,identifier,...}"
Relate one or more pieces of content using a lucene query
{relationship field velocity variable name}:"{lucene query}"
Relate one or more pieces of content using a comma separated list of lucene queries and identifiers
{relationship field velocity variable name}:"{lucene query},{identifier},{lucene query},{identifier}"
Examples of Curl commands submitting related content using either identifier or lucene query
Create New Employee with Query for Location Identifier
curl -v -u admin@dotcms.com:admin -XPUT http://localhost:8082/api/content/Publish/1 -H "Content-Type:application/json" -d '{
   contentType:"Employee",
   languageId:1,
   firstName:"Dean",
   lastName:"Gonzalez",
   gender:"male",
   jobTitle:"General Manager",
   email:"dean@dotcms.com",
   location:"+identifier:0c69da5c-2a05-452f-9305-3be6926d5079"
}'
Create New Employee with Lucene Query for “South America” as Location Office Name
curl -v -u admin@dotcms.com:admin -XPUT http://localhost:8082/api/content/Save/1 -H "Content-Type:application/json" -d '{
   contentType:"Employee",
   languageId:1,
   firstName:"New",
   lastName:"Person",
   gender:"male",
   jobTitle:"General Manager",
   email:"person@dotcms.com",
   location:"+contentType:Location +Location.title:\"South America\""
}'
Submit new Location and Relate to Many Employees with Job Title of President
curl -v -u admin@dotcms.com:admin -XPUT http://localhost:8082/api/content/Publish/1 -H "Content-Type:application/json" -d '{
   contentType:"Location",
   host1:"48190c8c-42c4-46af-8d1a-0cd5db894797",
   languageId:1,
   title:"Melbourne Office",
   country:"Australia",
   address1:"1122 Aussie Avenue",
   city:"Melbourne",
   segment:"banking,investing",
   description:"Melbourne Australia Office",
   employees:"+contentType:Employee +Employee.jobTitle:President*"
}'
Submit new Location and Relate to Many Employees with Job Title of President and an Employee Identifier
curl -v -u admin@dotcms.com:admin -XPUT http://localhost:8082/api/content/Publish/1 -H "Content-Type:application/json" -d '{
   contentType:"Location",
   host1:"48190c8c-42c4-46af-8d1a-0cd5db894797",
   languageId:1,
   title:"Melbourne Office",
   country:"Australia",
   address1:"1122 Aussie Avenue",
   city:"Melbourne",
   segment:"banking,investing",
   description:"Melbourne Australia Office",
   employees:"+contentType:Employee +Employee.jobTitle:President*,37f93fcb-6124-46af-83b4-9ece6c1c5380"
}'
Update an Employees Passing Employee Identifier and Identifier of Office Location to the Location Field
Please note that the employee's relationship to ANY current office location would be replaced by the new office location being passed to the relationship field
curl -v -u admin@dotcms.com:admin -XPUT http://localhost:8082/api/content/Publish/1 -H "Content-Type:application/json" -d '{
   contentType:"Employee",
   identifier:"74ebbf55-2821-4b51-8e66-78d54c839991",
   location:"6f19f0a0-f407-4f4c-8c01-58daf6659321"
}'
DEPRECATED - Legacy Relationships Example: Blog-Comments Relationship - DEPRECATED
To specify that a piece of content is related to another piece of content, you must pass the Relationship name as the header field name/key and a Lucene query as the value.
For example the Content Types “Blog” and “Comments” found in the dotCMS starter site and demo site have a one to many relationship between them called “Blog-Comments”.
A new comment matching the parent News post can be added by:
- Adding a “Blog-Comments” field in the JSON data.
- Adding a Lucene query to the field to identify the Blog content item the comment will be linked with.
The header field would have a format similar to the following:
"Blog-Comments", "+identifier:12321-123-123123"
Important Notes:
- The Lucene query must return a single content item for the relationship to be saved properly.
- To relate a piece of content to multiple pieces of content, you must add a relationship field/value header for each content item you wish to create a relationship to.
- When updating content using the REST API, you must submit all relationships for a piece of content each time you update the content.
- If you wish to add a new relationship but maintain all existing relationships, you must first find all existing relationships so that you can include them when updating the content.
- Any relationships which are not included when you update a content item via the REST API will be removed from that content item.
The following curl command submits a new comment and relates it to a Blog content item:
curl -v -u admin@dotcms.com:admin -XPUT http://localhost:8082/api/content/publish/1 -H "Content-Type:application/json" -d '{
   contentType:"Comments",
   languageId:1,
   title:"test comment",
   email:"myemail@mydomain.com",
   comment:"this is my cool comment",
   Blog-Comments:"+contentType:Blog +title:picks"
}'
The comment should appear in the post “Bill Ackman's Top Stock Picks” that comes by default in the starter. Note that some fields will be left empty as this example only sends the fields required by the Content Type.
Please also see the Example Employee Profile form with Relationship and Binary field below.
Code Examples
The following examples demonstrate how to use the content REST API using scripting and code within dotCMS (such as to submit forms using the REST API).
Using jQuery
Ajax content can be sent to dotCMS, making it possible to create rich Ajax applications within dotCMS. The following example uses jQuery.ajax to create content in a custom Content Type.
Consider the following Blogpost Content Type:
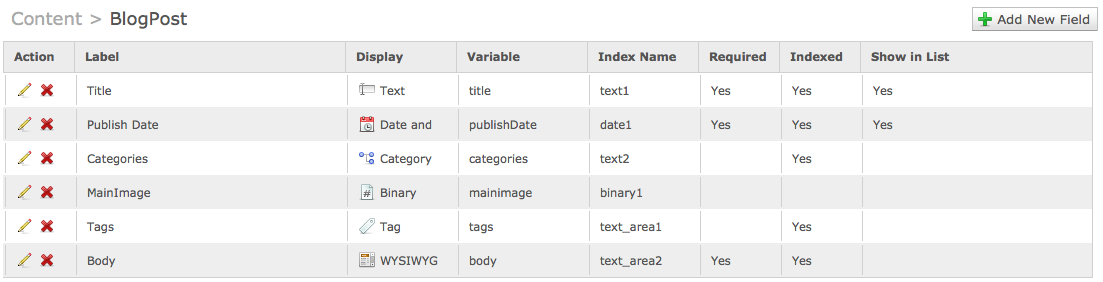
The URL Map Pattern is configured as /Blogpost/{title}. (Note that in a real world application a custom “Url Title” field would be used instead, to convert the title to a URL-friendly string).
The below example page uses jquery to post data to dotCMS. This is the page in its entirety, and this code can be cut and pasted into a blank template, for example purposes.
The form data is first captured as a JSON object, then that data is PUT to the dotCMS server via an $.ajax call. If the Blogpost Content Type has been configured as displayed above, this will create a new content item with the values that passed via the $.ajax call.
<html>
  <head>
    <title>dotCMS REST Content Save</title>
    <link href="//netdna.bootstrapcdn.com/twitter-bootstrap/2.3.1/css/bootstrap-combined.min.css" rel="stylesheet">
    <script type="text/javascript" src="//ajax.googleapis.com/ajax/libs/jquery/1.9.1/jquery.min.js"></script>
    <script type="text/javascript" src="//netdna.bootstrapcdn.com/twitter-bootstrap/2.3.1/js/bootstrap.min.js"></script>

    <script type="text/javascript" >

      $(document).ready(function() {

        $("#newPost").submit(function(e) {
          e.preventDefault();

          var dataObj={'title': $('#title').val(),
          'publishDate': $('#publishDate').val(),
          'body': $('#body').val(),
          'categories': $('#categories').val().join(','),
          'tags': $('#tags').val(),
          'contentType':'Blogpost'};

          $.ajax({
            url: '/api/content/publish/1',
            type: 'PUT',
            cache:false,
            data: dataObj,
            beforeSend: function (request){
              // This sends the user who authenticates against the dotCMS server
              // In a real world example, you could use session based authentication
              request.setRequestHeader("DOTAUTH", window.btoa("admin@dotcms.com:admin"));
            },

            success: function(data,status,xhr) {
              alert("Success: "   );
              window.location = "/Blogpost/"+$('#title').val();
            },
            error: function(data,status,xhr) {
              alert("fail: " + data );
            console.log(data );
            },
          });
        });
      });

    </script>
  </head>
  <body>
    <div class="container">
      <div class="row">
        <form id="newPost" action="">
          <label for="title">Title</label>
          <input type="text" name="title" id="title"/>

          <label for="publishDate">Publish Date</label>
          <input type="text" name="publishDate" value="2013-07-28 10:34" id="publishDate"/>

          <label for="categories">Categories</label>
          <select id="categories" name="categories" multiple="multiple">
            <option value="design">Design</option>
            <option value="development">Development</option>
            <option value="frontEndDevelopment">Front End Development</option>
            <option value="nosql">NoSQL</option>
            <option value="projectManagement">Project Management</option>
          </select>

          <label for="mainimg">Main Image</label>
          <input type="file" name="mainImage" id="mainImage"/>

          <label for="tags">Tags</label>
          <input type="text" name="tags" id="tags"/>

          <label for="body">Body</label>
          <textarea id="body" name="body"></textarea>
          <div>
          <input type="submit" class="btn" id="Post" name="Post" value="Post"/>
          </div>
        </form>
      </div>
    </div>
  </body>
</html>
Note that the option list for categories can be generated automatically using Velocity and the Categories viewtool.
This page creates the content and then redirects to the URL Map detail page to display the newly created content.
Note that we allow jquery to encode the data as application/x-www-form-urlencoded, which is the default jquery encoding.
Sending Binary Fields Using jquery
In order to send a file to the Binary field we need to construct a FormData object in javascript. This API can be found in all modern browsers and is generally safe to use.
$(document).ready(function() {
    $("#newPost").submit(function(e) {
        e.preventDefault();

        var dataform=new FormData();

        var json={
            'title': $('#title').val(),
            'publishDate': $('#publishDate').val(),
            'body': $('#body').val(),
            'categories': $('#categories').val().join(','),
            'tags': $('#tags').val(),
            'contentType':'Blogpost'
        };
        dataform.append('json',JSON.stringify(json))

        dataform.append('file', document.getElementById('mainImage').files[0]);


        $.ajax({
            url: '/api/content/publish/1',
            type: 'PUT',
            data: dataform,
            processData: false,
            contentType: false,
            success: function(data,status,xhr) {
                window.location = "/Blogpost/"+$('#title').val();
            }
        });
    });
});
Notes:
- In order to ensure that a multipart/form-data request is sent to the server,
processDataandcontentTypemust be disabled in the call tojquery.ajax. - The json data is added to the dataform with the name “json”.
- This enables the dotCMS server to recognize that the value is JSON encoded data.
- Due to limitations in the FormData interface the
content-typeof the body part can't be set to JSON, and it is instead set totext/plainby default. - However the dotCMS server will process it as JSON if either the
content-typeis set to JSON (application/json) or if the name of the body part is 'json'. - The same process is used for 'xml' and 'urlencoded' formats.
- These formats must be added using the name “xml” and “urlencoded” to notify the dotCMS server of the format being used.