dotCMS supports firing custom webhooks at every point of a content lifecycle using custom Workflow Actions which can include custom Workflow Sub-Actions implemented via Java classes or Velocity scripts. Since every 3rd party system has different hooks which require different parameters, methods and HTTP headers, the ability to script when and how dotCMS fires webhooks is a very powerful and flexible tool.
The Velocity Scripting Workflow Sub-Action
When the “Velocity Script” Workflow Sub-Action is added to a Workflow Action, the Velocity script is executed whenever that Workflow Action is executed for a piece of content. This Sub-Action provides access to all the Velocity tooling built into dotCMS, including the ability to call or post the values of that content to remote REST endpoints using the $json Viewtool.
Examples
There are a number of tools online which can help developers and integrators test webhooks. For the sake of these examples, we are using a tool called PostBin, which simply accepts any incoming webhook and reports back on the request. The examples below require that you get a PostBin id with which to test.
Example 1: Fire a Webhook when Content is Published
- Navigate to the Workflows Tool (Types & Tags -> Workflows) in the dotCMS back-end.
- Select the Workflow Scheme you wish to add the webhook to.
- In this example, we will use the System Workflow.
- Click the “Save / Publish” Workflow Action to edit the Action.
- In the list of Sub-actions, add a new Sub-action “Velocity Script”
- Click on the “Velocity Script” Sub-action, to open its properties.
- Set the “Script Code” property to the following:
$json.fetch("https://postb.in/[YOUR_POSTBIN_ID]?action=PUBLISH&identifier=$content.identifier") - Save the Workflow Action.
- In the Content Search screen, edit a piece of content.
- Execute the “Save / Publish” Action for that content.
- Open PostBin and navigate to the reporting page.
Result:
You should see that:
- The webhook has fired for your content, and
- The content identifier has been passed in appropiately.
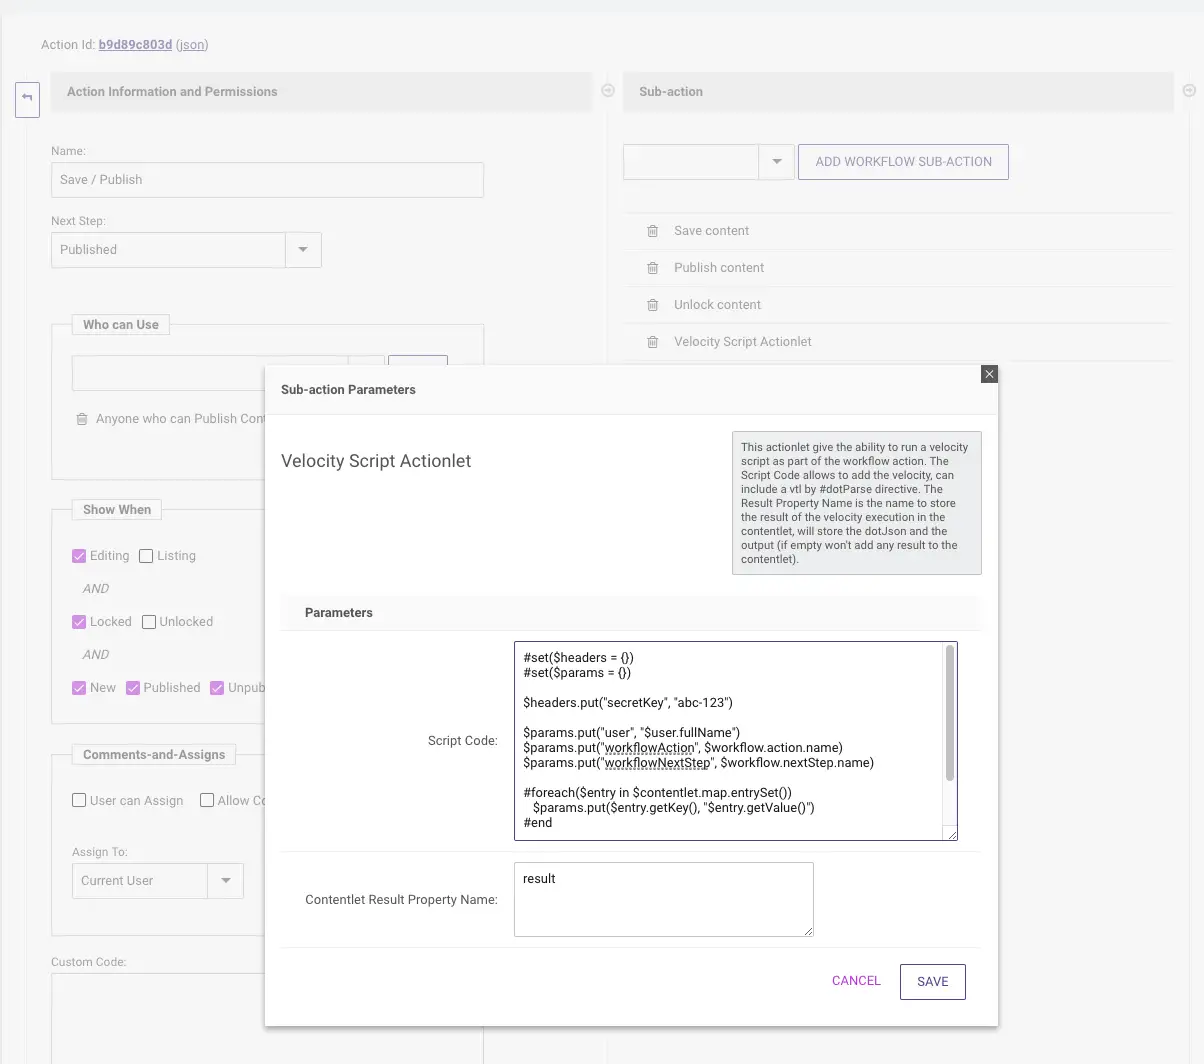
Example 2: POST Content Values with a Custom Header to a Webhook
- Navigate to the Workflows Tool (Types & Tags -> Workflows) in the dotCMS back-end.
- Select the Workflow Scheme you wish to add the webhook to.
- In this example, we will use the System Workflow.
- Click the “Save / Publish” Workflow Action to edit the Action.
- In the list of Sub-actions, add a new Sub-action “Velocity Script”
- Click on the “Velocity Script” Sub-action, to open its properties.
- Set the “Script Code” property to the following:
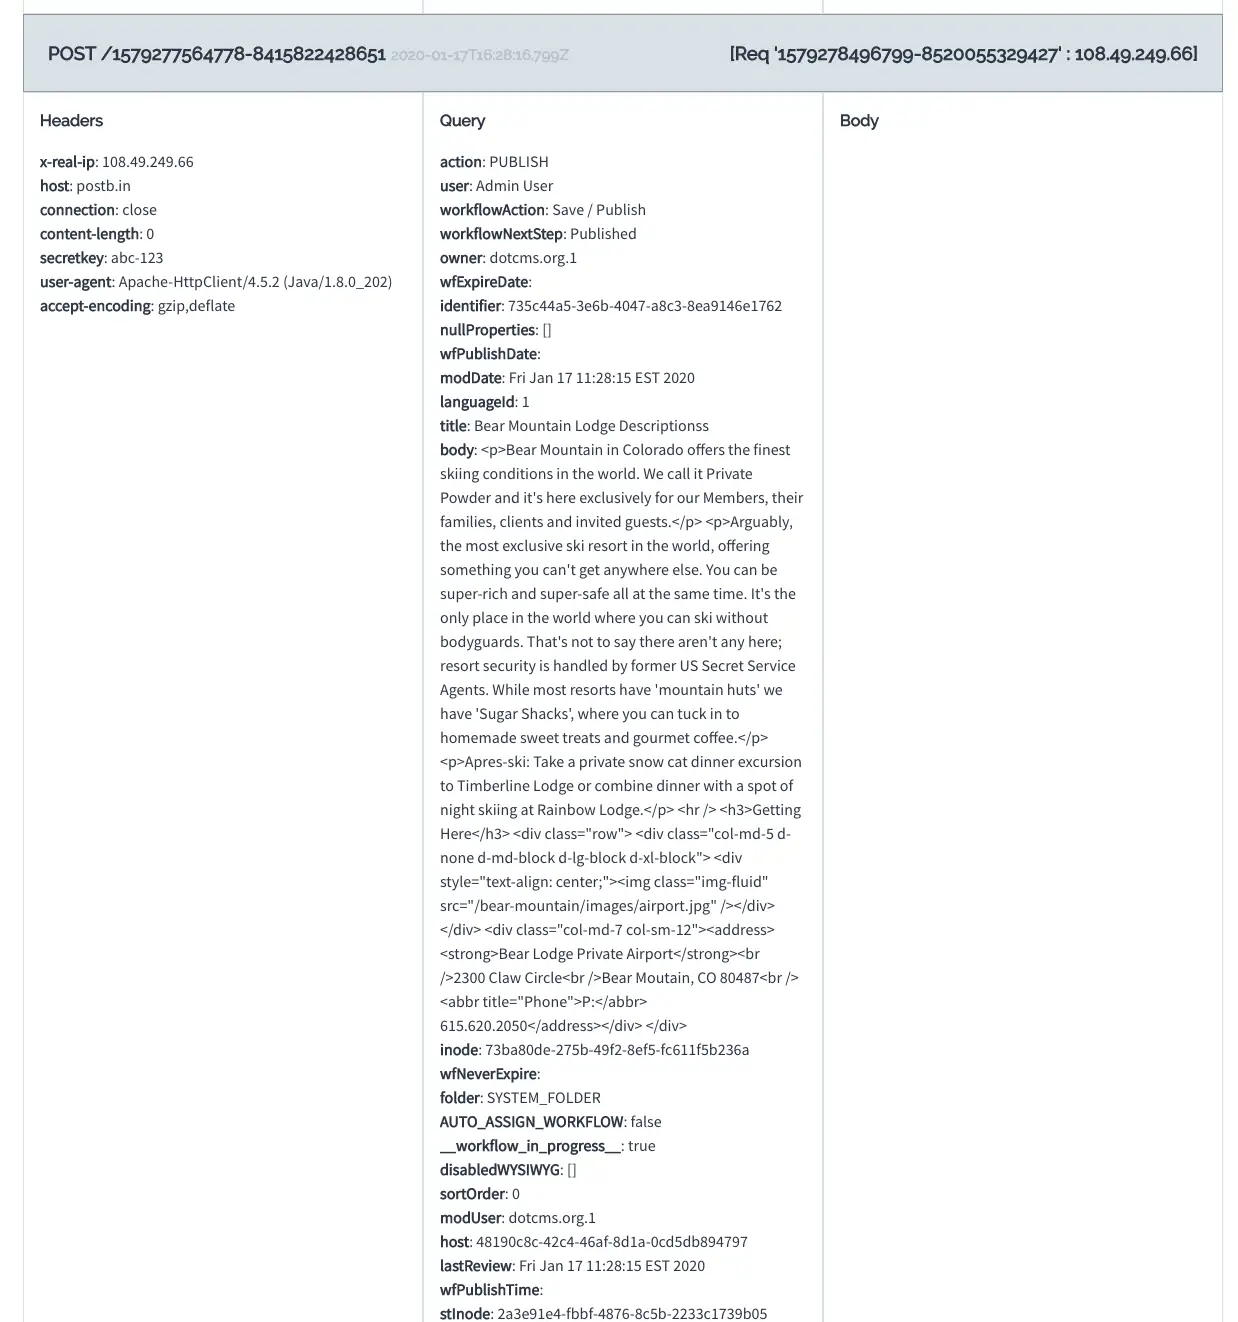
#set($headers = {}) #set($params = {}) $headers.put("secretKey", "abc-123") $params.put("userName", "$user.fullName") $params.put("workflowAction", $workflow.action.name) $params.put("workflowNextStep", $workflow.nextStep.name) #foreach($entry in $contentlet.map.entrySet()) $params.put($entry.getKey(), "$entry.getValue()") #end $json.put("https://postb.in/[YOUR_POSTBIN_ID]", $headers, $params) - Save the Workflow Action.
- In the Content Search screen, edit a piece of content.
- Execute the “Save / Publish” Action for that content.
- Open PostBin and navigate to the reporting page.
Result:
You should see that:
- The webhook has fired for your content, and
- The content's values have been passed in appropiately, including:
- The custom header,
- The name of the User who fired the workflow, and
- The Workflow Action that was executed.
Example 3: Accept a remote webhook using the scripting API
This example uses the scripting API to accept a webhook POST and sends out the recieved data as an email. To use this, create a .vtl file under /application/apivtl/text/post.vtl This file will handle POSTs to the endpoint /api/vtl/text. As you can see, the folder name /text/ is the name of the endpoint. If you need to handle PUTs or GETs as well, you can add files called ./put.vtl or ./get.vtl respectively. Below is the contents of the ./post.vtl file. It accepts the json data in a variable called $bodyMap and iterates over it to build the email message. It then sends this message out using the $mailer tool included in dotCMS. Learn more about Scripting API.
## $bodyMap is a map of the json data that is posted in to dotCMS. In this example, we just build a emailMessage string and email it to a group

#set($emailMessage = "<h3>Incoming Webhook Post</h3>")
#foreach($key in $bodyMap.keySet())
   #set($emailMessage = "$emailMessage <br><b>$key</b> : $bodyMap.get($key)")
#end


$mailer.sendEmail( "webhook@dotcms.com", "website@dotcms.com", "Incoming Text via API", $emailMessage, true )