The Publishing Environments tab displays a list of Send To Environments that your dotCMS server can publish content to.
Configuring Environments and Servers
- You can have multiple Send To Environments, and you can group multiple Endpoint servers into each Environment. Each time you push content, you can choose which Environment(s) it is pushed to, which in turn determines which server or servers the content is pushed to.
- You can have multiple Receive From servers, and any of them may push to your dotCMS server at any time (subject to push permissions and configuration on the sending server).
- For any push to succeed, both the sending server and the receiving server must be properly configured:
- The sending (pushing) server must include the receiving server as an Endpoint Server in one of its Send To Environments.
Retrieving Environment Identifiers
When performing push publishing operations headlessly, it is sometimes necessary to retrieve the identifier of the push publishing environment. This can be done in a few ways; the most straightforward of these is through another API call — in particular, performing a GET call to the api/environment endpoint. For example:
curl -X 'GET' \
  'http://localhost:8081/api/environment' \
  -H 'accept: application/json' \
  -H "Authorization: Bearer $TOKEN"
This returns an object that specifies identifiers alongside their respective environment names.
For a more gated approach, environments can be fetched on the basis of a role identifier:
curl -X 'GET' \
  'https://demo.dotcms.com/api/environment/loadenvironments/roleId/e7d4e34e-5127-45fc-8123-d48b62d510e3' \
  -H 'accept: application/json' \
  -H "Authorization: Bearer $TOKEN"
Alternately, if logged in to the back end, you can use your browser to retrieve an environment's ID. Browse to System -> Configuration -> Publishing Environments. Open your browser developer tools (such as, on Chrome or Firefox, by hitting F12 or by right-clicking anywhere and selecting “Inspect”), and browse to the “Network” tab. Now click on either an environment or an endpoint, and note the operations the Network tab records; these will contain an identifier for the environment.
Send To Environments
A push publishing Environment allows you to group one or more Endpoint servers to receive content pushed to the Environment. To create a new Environment, click the Add Environment button on the Publishing Environments tab.
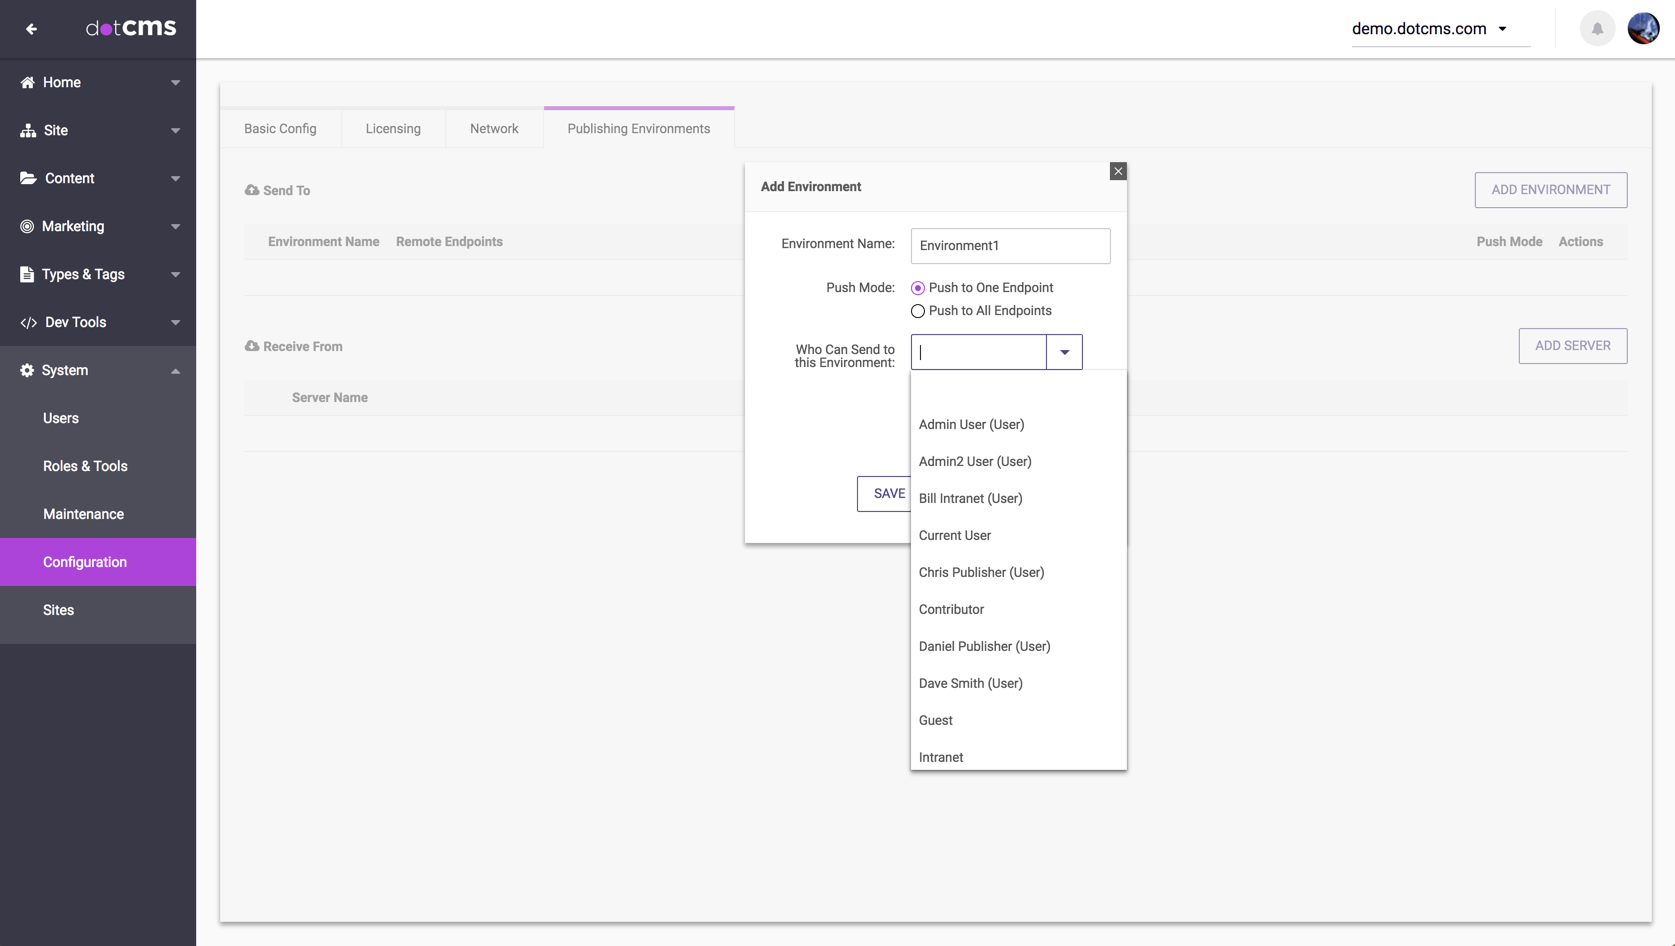
A dialog box opens with the following fields:
| Parameter | Description |
|---|---|
| Environment Name | The name of the Environment. Displayed and selected when users push content. |
| Who Can Send to this Env | Specifies push Permissions, defining which Users and/or Roles are allowed to Push content to this Environment. |
| Push Mode | Specifies whether content pushed to this Environment is pushed to just one Server configured in the Environment or all of them.
|
Important: Pushing to a Cluster
When pushing to a cluster, you must do one of the following:
- Set the Push Mode to Push to One Server.
- When you push to a single server in a cluster, the servers in the cluster automatically synchronize the content among themselves.
- If you attempt to push to all servers in the cluster, different servers may end up with different copies of the same content, which will cause synchronization problems among the servers in the cluster.
- Push to a Load Balancer placed in front of the cluster.
- It is recommended practice to use a Load Balancer in front of a cluster, to help manage performance.
- When you use a Load Balancer, it is recommended that you push to the Load Balancer, rather than to the individual servers in the cluster.
Endpoint Servers
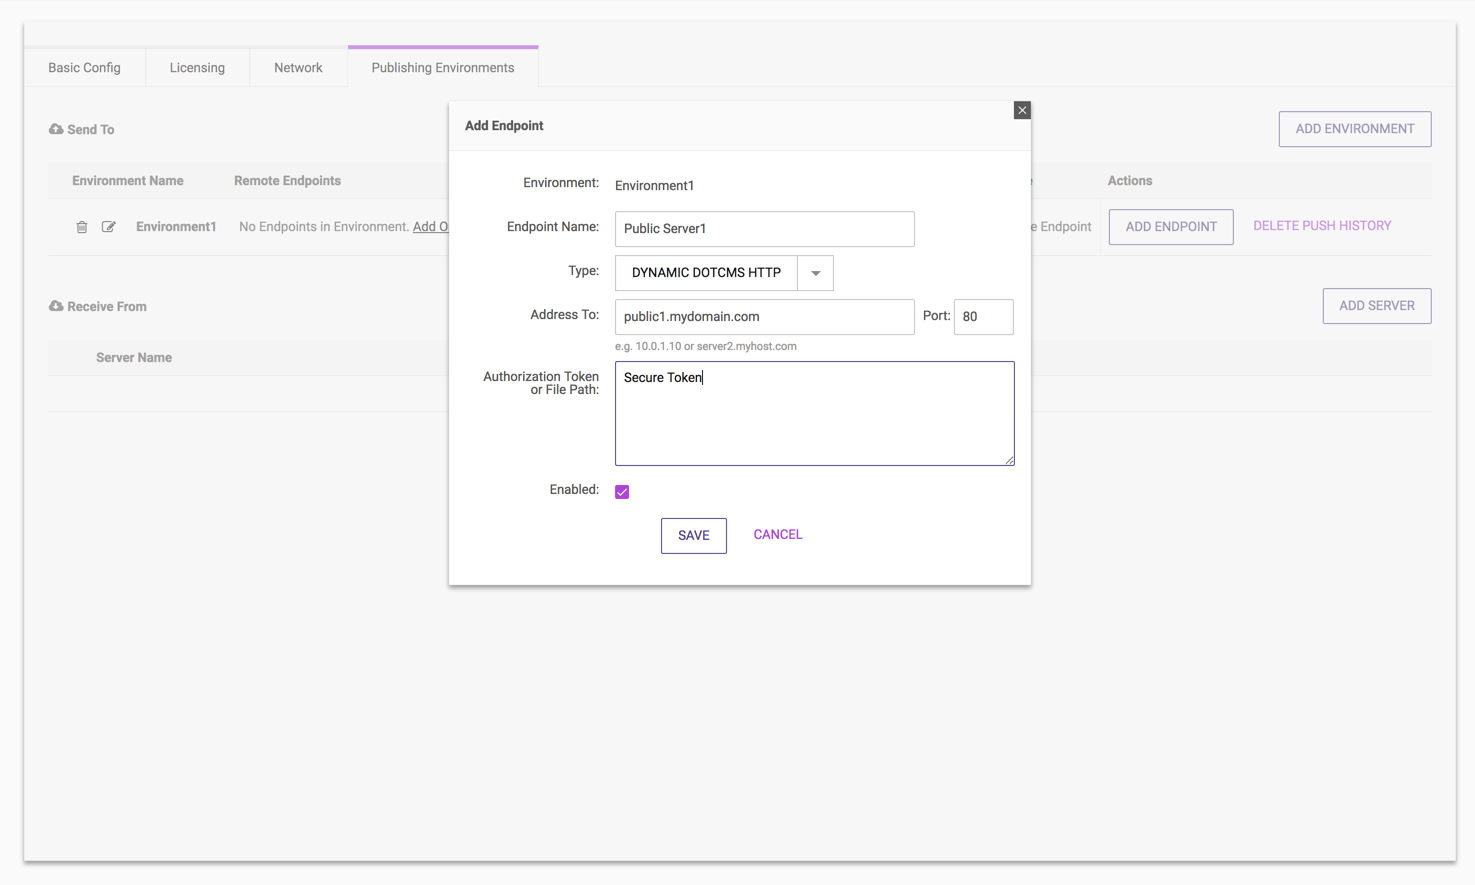
An Endpoint server is configured within an Environment and defines an individual receiving server to Push content to. To create an Endpoint server click Add Server and enter values for the following fields in the popup:
| Parameter | Applies To | Description |
|---|---|---|
| Server Name | All Endpoints | A friendly name for the server. |
| Type | All Endpoints | The Endpoint Type. |
| Address To | Dynamic Endpoints | The DNS server name or IP address of the receiving server. |
| Port | Dynamic Endpoints | The port to connect to the server. This value defaults to 80, and should be set to whatever port is used to connect to the front-end of the server. |
| Authentication Token/File Path | Dynamic Endpoints | This can be either a token key or an absolute path to a file in the file system that contains a key. The key must match the one configured in the Receiving server for its Authoring Server. See Authentication for details. |
| Properties | Static Endpoints | The Properties of the Static Endpoint. |
| Enabled | All Endpoints | Enables or disables If checked it enables sending to this individual server. |
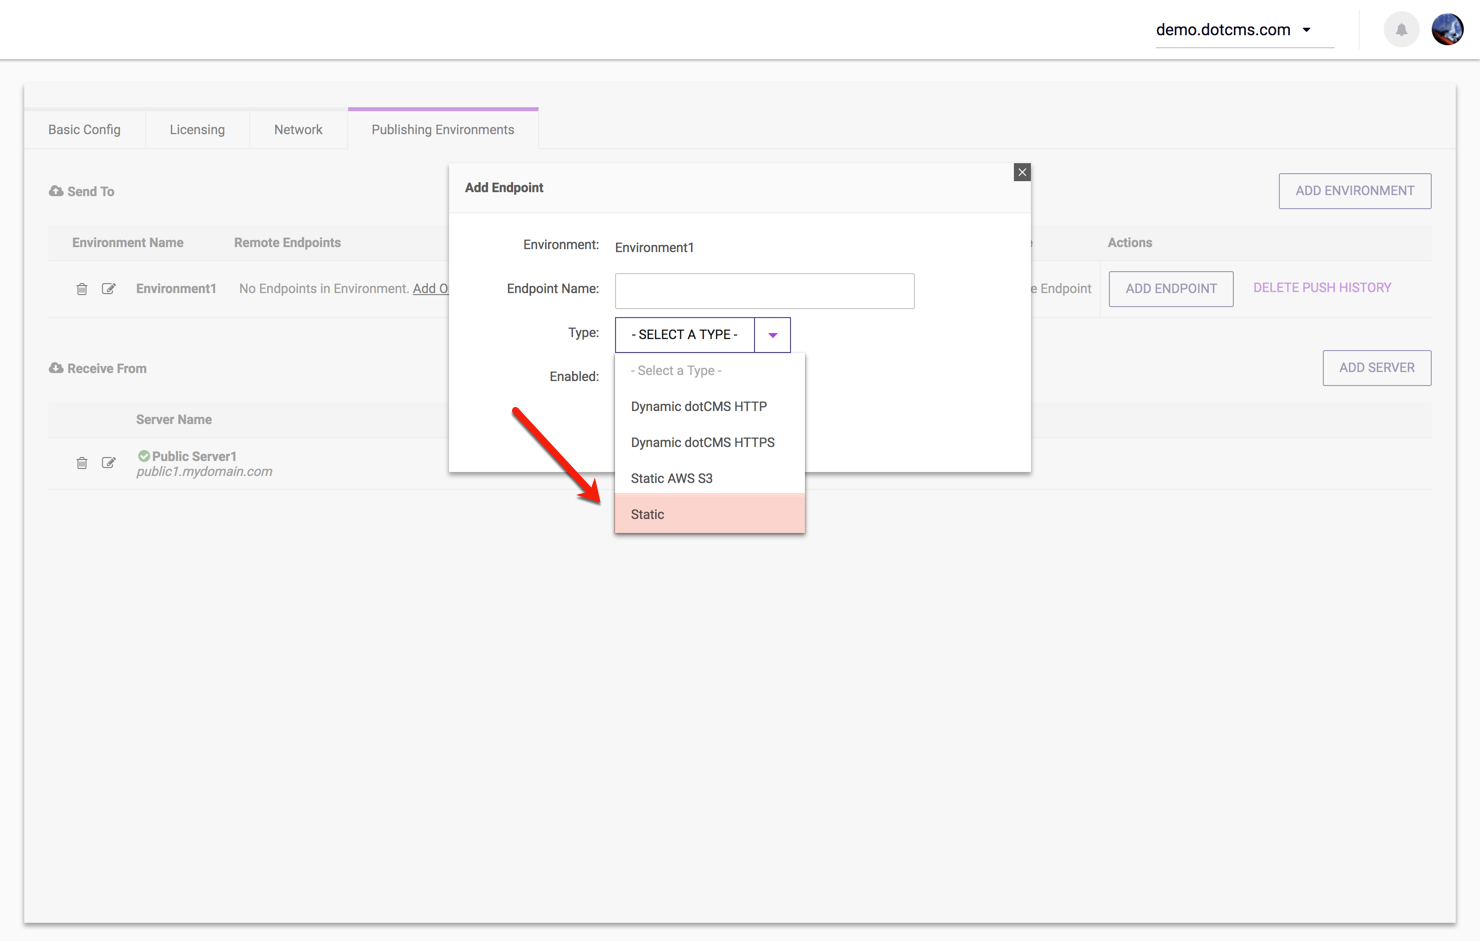
Endpoint Type
| Endpoint Type | Description |
|---|---|
| Dynamic dotCMS HTTP | A Dynamic Endpoint using HTTP (regular HTTP) protocol. |
| Dynamic dotCMS HTTPS | A Dynamic Endpoint using HTTPS (Secure HTTP) protocol. |
| Static AWS S3 | A Static Endpoint writing to an Amazon Web Services (AWS) S3 Storage server. |
| Static | A custom static endpoint capable of receiving bundles through SCP or SFTP. |
Static AWS S3 Endpoint Properties
When you select Static AWS S3 for the Endpoint Type, you must set the value of several properties which specify how dotCMS connects to your AWS S3 server to upload your static content.
Note: Static Endpoints are only supported in dotCMS Enterprise editions for customers with a Site License (Platform level license). Please see the list of dotCMS versions for more information on features supported in different version of dotCMS.
The following table lists all of the properties recognized in the Static AWS S3 Endpoint configuration:
| Property | Required | Default Value | Description |
|---|---|---|---|
aws_access_key | *Optional | Must be changed or set using the *default credential provider | Your Amazon AWS Access Key ID. |
aws_secret_access_key | *Optional | Must be changed or set using the *default credential provider | Your Amazon AWS Secret Key ID. |
aws_bucket_name | Yes | dotcms-bucket-{hostname}-{languageIso} | The pattern to use to generate the AWS S3 Bucket Name. For more information, please see Bucket Name Variables, below. |
aws_bucket_region | Yes | Automated Region Selection | The Amazon AWS Region your AWS S3 server is located in. |
aws_bucket_folder_prefix | No | None | The prefix property creates a subfolder(s) under the bucket - in this case for each language configured on each site. |
aws_validation_bucket | No | Random Bucket Name | The bucket name used to validate the AWS S3 connection parameters and permissions. For more information, please see the Push Publishing Permissions documentation. |
aws_endpoint | No | Amazon AWS | This optional property allows you to target an S3 or S3-compatible object store other than Amazon's AWS service. Accepts a URL as its value, such as https://play.min.io/ or https://digitaloceanspaces.com |
The following default values are filled in when you create a new Static AWS S3 endpoint. Please note that, as described in the table above, you must change the values of the aws_access_key and aws_secret_access_key to the appropriate values OR both values can be removed from the static endpoint configuration as long as a default credential provider has been set up in the AWS configuration. The aws_bucket_name and the aws_bucket_region, however, must always be set for each static endpoint configured in dotCMS.
* To configure a Default Credential Provider, please see the AWS credentials documentations .
aws_access_key=myToken
aws_secret_access_key=mySecret
aws_bucket_name=dotcms-bucket-{hostname}-{languageIso}
aws_bucket_region=us-west-2
AWS S3 Region
The aws_bucket_region specifies the AWS region that the Endpoint will publish to.
- If you do not supply a value for this property or if you select the region
us-east-1:- dotCMS will connect to AWS S3 in a way that causes Amazon AWS to automatically select a region based on the geolocation of your dotCMS server.
- Note that when you select the
us-east-1region the region is still automatically selected based on your geolocation due to a historic limitation in the way the AWS S3 API allows selection of regions (from a time when AWS S3 supported only a single region, which eventually became the us-east region).- If you wish to specifically choose an AWS region on the East Coast of the United States, you must specify
us-east-2instead ofus-east-1.
- If you wish to specifically choose an AWS region on the East Coast of the United States, you must specify
- If you select a region other than
us-east-1from the list of valid AWS regions:- dotCMS will connect only to the specific region you choose.
Bucket Name Variables
When specifying the aws_bucket_name property, you may add variables to the value of the property. These variables will be evaluated and replaced with appropriate values each time a push is performed to the Static Endpoint. The variables allow you to create multiple buckets for different sites and/or different versions of your sites as needed to both display all your site content in static form, and to maintain different static versions of your site(s) over time.
When you push to a Static Endpoint, if any variables are included which separate the content of the site (such as when the {languageIso} variable is included), the push will be performed to multiple buckets at the same time - one bucket for each appropriate value of the variables.
Special Note: Special Characters are NOT allowed in bucket names. The following non-alphanumeric characters will cause communication errors:
.. , ! : ; & ? $ * / \ [ ] = | # _ " " @ ( ) < >
For more information, please see the Amazon Bucket Restrictions documentation.
The following is a list of the static variables supported by the aws_bucket_name and aws_bucket_folder_prefix properties:
| Variable | Description |
|---|---|
{hostId} | The identifier of your dotCMS Site. This means that you will have a different bucket (or set of buckets) for each Site on your dotCMS instance. |
{hostname} | The name of your dotCMS Site. This means that you will have a different bucket (or set of buckets) for each Site on your dotCMS instance. |
{languageIso} | The ISO language code for the language of the content. This means that you will have a different bucket (and thus a different static site) for each Language you have configured on your dotCMS instance. |
{languageId} | The Language ID for the language of the content. This means that you will have a different bucket (and thus a different static site) for each Language you have configured on your dotCMS instance. |
{languageCountry} | The country code for the language .
|
{date} | The date of the push (in the form yyyyMMdd-HHmmss).This means that you will have an entirely separate static version of your site for each date you push to the Static Endpoint. |
{date-FFFFFFFF} | The date and/or time of the push in a format you specify by replacing the FFFFFFFF in the variable name with the date and time format.
|
Custom Static Endpoints
A static endpoint does not need to be Amazon S3 or a dotCMS instance. Static bundles can be pushed to any server by setting up a custom Static endpoint to any destination machine accessible via SCP or SFTP. To implement a custom static endpoint, you must install an OSGI plugin, and the sending and receiving endpoints must share an SSL certificate.
Perform the following steps to install the OSGI plugin.
1. Download the plugin
The com.dotcms.staticpublish.listener plugin can be pulled from the dotCMS plugin-seed repository: https://github.com/dotCMS/plugin-seeds/tree/master/com.dotcms.staticpublish.listener.
2. Configure the plugin.properties file in the plugin
Information about how to access the destination server is configured in the plugin.properties file (in the plugin /src/main/resources/ directory) and consists of the following 4 properties:
| Property | Description |
|---|---|
key.file.path | Path to pem key with credentialed access to destination server. |
ssh.user | User name (on the remote server) with ssh access to the destination server. |
hosts | IP address of the destination server. |
remote.path | Folder on the destination server where static files will be written. |
The following sample shows the format of each of the properties:
key.file.path = /some/path/some_key.pem
ssh.user = dotcms_admin
hosts = 127.0.0.1
remote.path = /remote/folderpath
3. Create the plugin jar file
In the plugin folder, run the following command to create the plugin jar file:
./gradlew jar
This generates a jar file in the plugin /build/libs/ directory.
4. Upload and Deploy the plugin jar file
To deploy the plugin:
- Login to the dotCMS back-end.
- Open the Plugins tool (Dev Tools -> Plugins).
- Press the Upload Plugin button, select the plugin jar file, and click “Upload Plugin”.
- In the “Available Plugins” menu at the top left, select the plugin.
- Press the “Load Plugin” button.
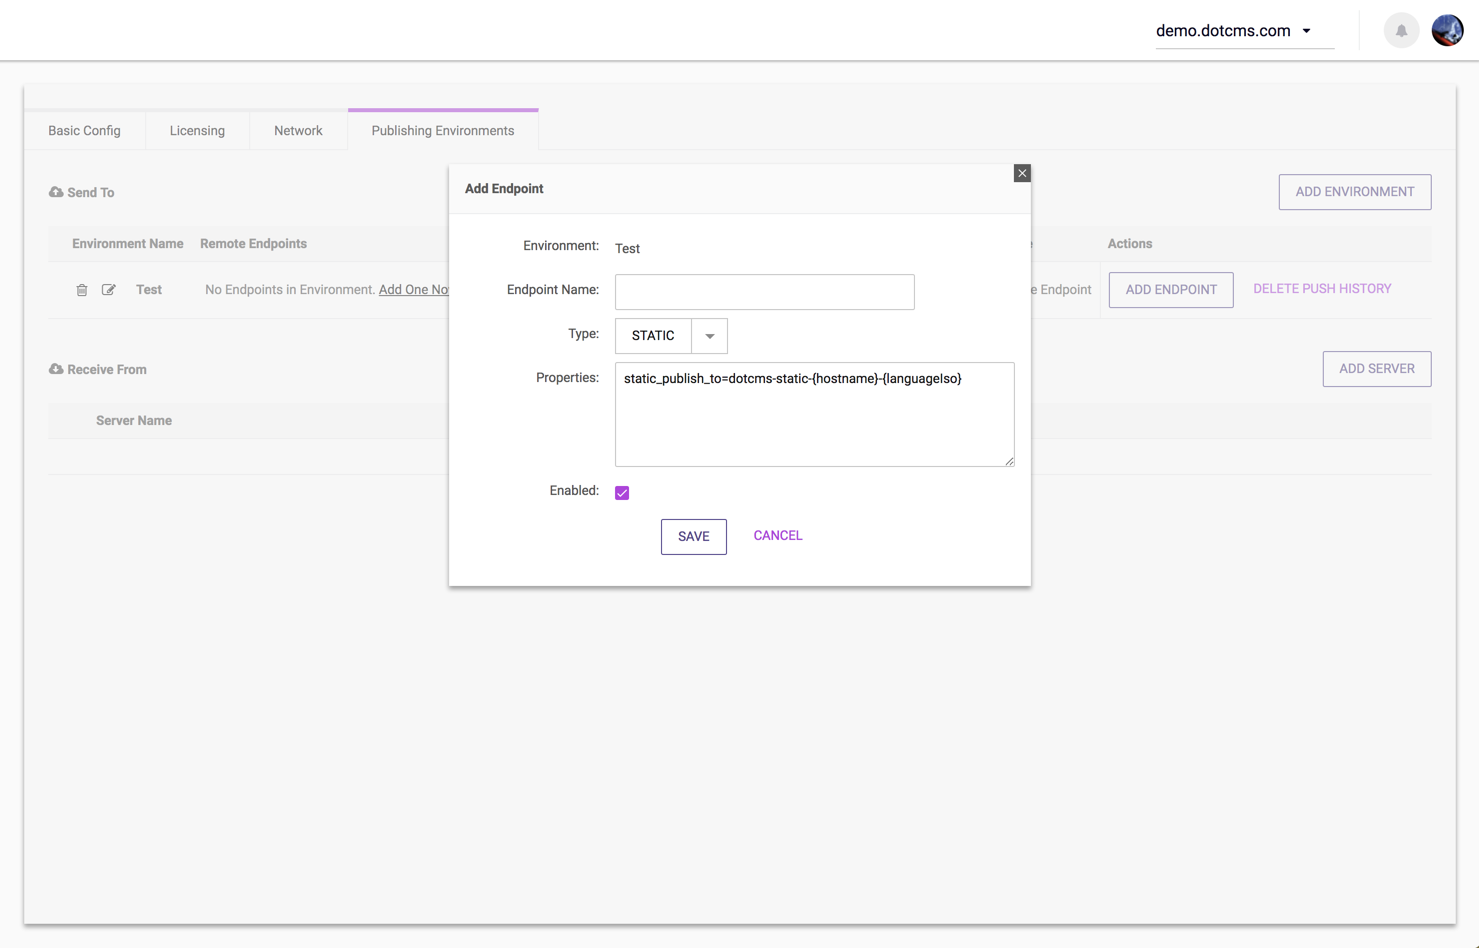
dotCMS Endpoint Configuration
On the dotCMS server which will be sending to the custom static endpoint, you may add a custom static endpoint to a Push Publishing Environment with the static option as shown in the image below:
Customizing the Folder Name
You must then define the name that dotCMS will use to create the directory on the static endpoint by setting the static_publish_to property:
| Property | Default Value | Description |
|---|---|---|
static_publish_to | dotcms-static-{hostname}-{languageIso} | Defines the name of the destination directory for the static objects being pushed. |
You may customize the folder names used to save the static content (in the static_publish_to property) in the same way you can customize the names of your AWS S3 buckets when using a Static AWS S3 endpoint. For more information, please see Bucket Name Variables, above.
SSL Certificate Requirements
When pushing to a custom static endpoint, the files are sent using SFTP. For the SFTP connection to succeed, the sending and receiving servers must share an SSL certificate. For more information on how this connection works, please see the Authentication without password using OpenSSH Key, certificates .pem and .pub article on the BeginningLinux site.
The files from the static push are delivered to the static enpoint via a Static Push Publishing Plugin using the same information in the configuration of your shared SSL certificate. For more information, please see the Static Push Publishing Plugin documentation.
Mixing Dynamic and Static Endpoints
You can mix Dynamic and Static Endpoints within the same publishing Environment. However it is important to understand that when mixing Dynamic and Static Endpoints in the same Environment, you should not select Push to One Server.
When you configure the Environment as Push to One Server and then push content, dotCMS randomly selects only one Endpoint in the Environment. If your Environment includes both Dynamic and Static Endpoints, dotCMS will select one of the Endpoints at random, which might be either a Dynamic Endpoint or a Static Endpoint, but not both. This will cause the Dynamic and Static sites to have different content and become out of sync with each other over time.
Instead, when you mix Dynamic and Static Endpoints in the same Environment, you should always select Push to All Servers.
Important Note: You should not select Push to All Servers when including a cluster in an Environment. Therefore if you mix the servers in a cluster (as a Dynamic Endpoint) with a Static Endpoint, you should include only one server from the cluster in the Environment.
Authentication Token/File Path
It is strongly recommended that you use the Authentication Token/File Path field to add an additional layer of security in the form of an authentication handshake between the sending and receiving servers. The use of an authentication key helps prevent a potential attacker from from sending content to the receiving server by “spoofing” (impersonating) the sending server.
The Authentication Token/File Path field can be set in three different ways.
- You can use the Get Token button on the Add Endpoint screen for the sender to retreive the token from the reciever automatically.
- The second way is to fill the field as path to a file on your dotCMS server containing text. dotCMS will read the contents of the file and use the string as the authentication key.
- The third way is when the string entered is a API token from a reciever administrator, dotCMS will use the string entered into this field to authorize the request using the normal JWT validation process and set the bundle owner to the authorizing user. The JWT API key can be found on the recieving server by going to the Control Panel, from there go to Users, and choose a user. Now click on API Access Keys and Request New Token.
The authentication key used must match on both the sending and receiving servers or the API key entered in the sender must match the key created on the recieving side for any push publishing connection between the servers to work. If the authentication keys don't match, any attempts to push content (or perform an Integrity Check) will fail.